Azure Network Connectivity and Name Resolution
Azure Network Connectivity and Name Resolution Free Tutorial Download
Description
Learn how to configure Microsoft Azure connectivity and name resolution with this expertly instructed course from Cloud Academy.
In this course, you will learn two different ways to connect virtual networks together. The course starts by teaching you how to set up peering between virtual networks and then moves on to showing you how to connect two VNets using a virtual network gateway. Once you have mastered network connections, you will learn how to use Azure DNS to configure custom domain names for the resources in your VNets. Finally, we will move on to learning how to set up both public and private DNS zones.
This course is essential for those looking to train enterprise teams since, by default, Azure virtual networks are isolated from each other and only have a rudimentary form of name resolution. To build useful networks in Azure, you will need to connect these virtual networks together. To make them easier to manage, you will need to implement custom name resolution.
This course is made up 7 lectures with an introduction and conclusion to aid in reviewing what you have learned throughout the course.
Learning Objectives
- Configure Azure virtual network peering
- Create a virtual network gateway and use it to connect two VNets
- Configure Azure DNS to handle name resolution
Intended Audience
- Those looking to become Azure cloud architects
- Those preparing for Microsoft’s AZ-100 or AZ-102 exam
Prerequisites
- Basic knowledge of Azure virtual networks
Additional Resources
- The GitHub repository for this course is at https://github.com/cloudacademy/azure-networks-and-dns
Transcript
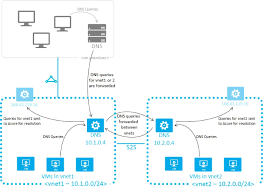
When you create a virtual network, Azure automatically sets up name resolution, so the VMs in it can communicate with each other using host names instead of IP addresses. Although this is very convenient, it has many limitations. For example, it doesn’t work across peered VNets. That is VMs in one VNet can’t resolve the host names of VMs in a peered VNet. You could solve this by setting up a custom DNS server, but a simpler solution is to use Azure DNS. Azure DNS is a service for hosting your domains, and managing your domain name system records. Until recently, it could only be used to host public domains, such as contoso.net, but the new private domains feature allows you to host private domains, such as contoso.local, that are only accessible from within your Azure virtual networks. We’ll start with a simple Azure DNS use case and work our way up to more complex ones. Before we get into private domains, I’ll show you how to use Azure DNS to host public domains. Suppose you have a web app, and you want to give people access to it at www.contoso.net and also at just contoso.net. First you need to create a zone.
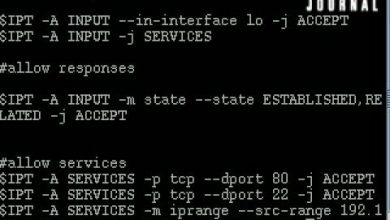
That’s where we’ll put the DNS records for the contoso.net domain. Type DNS in the search bar in the Azure portal. There’s DNS zones, which is what we want. Click add. Then type the name of the zone, which is the same as the name of the domain. In this case, it’s contoso.net. Create a new resource group or use an existing one. Then click create. When it’s done, go to the zone. You’ll see that it has filled in a couple of records for you already. DNS records says which name servers to use. It configured four of Azure’s name servers. The SOA records stands for start of authority. This gives information about the zone, such as the email address of the administrator, the master name server for the zone, and how often a secondary name server should refresh, that is check for updates from the master. Now we can create a record to translate contoso.net to an IP address. Click add record set. In the name field, we’re supposed to type a host name that comes before .contoso.net. For example, we could put www here, but what should we put if this is a record for contoso.net itself? We can’t leave it blank because it’s a required field.
We’ll have a look at what name was used for the NS and SOA records. Those records are for the root of the domain as well, so we should use the same name as they do. Type the at symbol in the name field. Leave the type of record as A which stands for address. The next field is TTL which stands for time to live. This says how long DNS clients can cache a response before they have to request the address again in case there’s an update to the record. We can leave it at one hour. Finally, we need to put in the IP address for the web app. We need to go into app services to get the address. I’ll open it in another tab. I have a web app called CA demo.
To get the IP address, you need to click on custom domains. There it is. Copy it, and then go back to the other tab, and paste it. It added another IP address field. This might seem strange, because if you put in multiple IP addresses for the same name, then how will DNS know which one the name should resolve to? Well, in that case, it chooses one randomly. This is actually quite common, especially for busy sites, because you can scale out by using multiple servers to handle the traffic. By the way, that’s why this is called a record set, rather than a record. A record set can contain multiple records for the same name. For this example, we only have one IP address, so leave it at that and click OK. If we were doing this for real, then we’d need to delegate this domain to Azure DNS. We would do that by going to the domain name registrar that we use to register our domain and entering these name servers in the registrar’s NS records for our domain. Once we did that and waited for 10 minutes or so for the information to propagate, anyone on the internet would be able to resolve contoso.net to its IP address. Let’s pretend that we did all of that. Now let’s create a record for www. Click add record set again. Then type www for the name. We could make this an A record, just like the last one, but it’s usually a better idea to make it a C name record instead.
A C name record lets you make this name an alias for another name that you’ve already defined. In this case, we want www.contoso.net to be an alias for our contoso.net, so they’ll both resolve to the same IP address. If we created an A record instead, and the IP address of our web app changed in the future, then we’d have to change the IP address in both records. This way, we’d only have to change it once. Now we also need to tell our web app to accept requests for contoso.net. We’re already on the custom domain’s page. Currently, the only host name assigned to this web app is the one Azure assigned to it. To use your own domain name, click add host name. Type www.contoso.net. Then click validate. You can see that the domain ownership test failed. That’s because I don’t actually own contoso.net. Remember when I said that you need to delegate this domain to Azure DNS by changing the name servers of the registrar. Since I didn’t do that step, the DNS records I added are only on the Azure DNS name servers and not in the worldwide DNS system. So Azure app services can’t find this record. I still want to show you something else though.
If I had delegated the domain properly, then I’d also need to add contoso.net to the web app. When I click validate for that, it fails of course, but it also says that it’s expecting to find two DNS records for contoso.net. One is an A record, which makes sense, but the other one’s a txt record, which seems kind of weird. A text record is just a place where you can associate some text with a domain. Azure app services is looking for something very specific in it though. You need to put in Azure’s default domain name for this web app. If you do that, then app services will consider this a verification that you are indeed the owner of the contoso.net domain, and then it can associate that domain with your web app. Once the verification is done, you can remove the text record from your DNS zone if you want to. Just for the sake of completeness, let’s add the record. Go back to the other tab, click add record set again, and change the type to txt.
Set the name to add again. For the value, we need the fully qualified domain name of the web app, so go back to the other tab, and copy it from the domain ownership section. Then paste it in the value field. Now that we’ve added all of the necessary records, let’s verify that we added them properly. Even though we didn’t tell a domain registrar about this domain, we can still test that the names will resolve properly. We can do that by using the NS lookup command and telling it to query one of the Azure DNS name servers directly. I’m going to open Cloud Shell and run it from there, but you can run it from your Windows, Mac, or Linux desktop if you want. If you run it from Cloud Shell, make sure it’s in bash mode. Okay, now type nslookup.
Then type the name we want to resolve which is www.contoso.net, and then the name server it should query. To get that, copy the first name server address from up here. There, notice that it doesn’t come back with the IP address. It only says that the canonical name, which is what cname stands for, is contoso.net. To get the IP address, we have to do a lookup on contoso.net. There. It resolved to the IP address of the web app. If you want to see all of the records for the root of contoso.net, then add q = any to the command. Now it also shows the NS records, the SOA record, and the text record. That’s it for configuring a custom public domain. In the next lesson, we’ll set up a private domain.
Download Azure Network Connectivity and Name Resolution Free
https://mshare.xyz/file/1AKaFV
https://anonfile.com/zb3en4g4od
https://drive.google.com/a/edusuccess.vn/file/d/1l_VqJ8-JJ5wT1kadade-9h1ewMQHihaC/view?usp=sharing
https://drive.google.com/a/edusuccess.vn/file/d/1Avmm9wGdYvSIzlrH-E4aMP-2iAv2pVdb/view?usp=sharing
https://uptobox.com/nmj9f51wu5l5